
A Step-by-Step Guide to Block Printing for Beginners
Have you ever admired the unique charm of block-printed textiles and wondered how those intricate patterns come to life? The magic of block printing lies in its simplicity, making it a wonderfully accessible and rewarding art form for anyone to try. At Adhunik Block Print, we celebrate this handcrafted tradition, and today, we’re excited to guide you through the process of creating your very own block-printed masterpiece!
This guide will walk you through the essential steps, tools, and tips to get started with block printing, whether you’re decorating a tote bag, a t-shirt, or simply experimenting on paper.
What You’ll Need: Essential Supplies
Before you dive in, gather your materials. You don’t need a lot to start, and many items can be found at craft stores or even around your home.
-
Fabric or Surface to Print On:
- For Textiles: Choose natural fibers like cotton, linen, or silk. Pre-wash and iron your fabric to remove any sizing and ensure better ink absorption. Items like tote bags, plain t-shirts, dishtowels, or pillow covers are great starting points.
- For Paper: Cardstock, watercolor paper, or any absorbent paper works well.
-
Printing Blocks:
- Hand-Carved Wooden Blocks: These are the traditional and most authentic option, often featuring intricate designs. You can buy pre-carved blocks (search for Indian block printing blocks, for example) or try carving your own from linoleum, rubber, or soft wood if you’re feeling adventurous.
- Found Objects: Get creative! Leaves, cut vegetables (potatoes are great for simple shapes), sponges, or even bottle caps can make interesting prints.
-
Fabric Ink/Paint:
- Textile Ink: Specifically designed for fabric, these inks are usually permanent once heat-set (check product instructions). Brands like Speedball, Jacquard, or Versatex are popular. Choose colors that contrast well with your fabric.
- Acrylic Paint (with textile medium): You can mix acrylic paint with a textile medium (available at craft stores) to make it suitable for fabric. This needs heat-setting too.
-
Ink Spreading Surface:
- A smooth, non-absorbent surface like a glass pane, a ceramic tile, a plastic palette, or even a sturdy disposable plate.
-
Brayer or Sponge:
- A brayer (rubber roller) is ideal for evenly spreading ink onto your block.
- A small sponge or a piece of cardboard can also work to dab and spread ink.
-
Protective Barrier:
- Newspaper, cardboard, or a plastic sheet to protect your work surface from ink. Place it inside garments to prevent bleed-through.
-
Wipes/Paper Towels and Water: For cleaning blocks and your hands.
-
Pencil and Ruler (Optional): For marking guidelines on your fabric.
Step-by-Step Guide to Block Printing
Now that you have your supplies, let’s get printing!
Step 1: Prepare Your Surface
- For Fabric: Wash, dry, and iron your fabric. This removes any sizing that might repel ink and ensures a smooth printing surface. Place a protective barrier (cardboard or newspaper) inside your garment (like a tote bag or t-shirt) to prevent ink from bleeding through to the other side. Lay your fabric flat and smooth on your protected workspace.
- For Paper: Simply lay your paper flat on your protected surface.
Step 2: Prepare Your Ink
- Squeeze a small amount of your fabric ink or paint onto your ink spreading surface. Start with a coin-sized amount; you can always add more.
- Use your brayer (or sponge/cardboard) to spread the ink evenly. Roll the brayer back and forth a few times until the ink forms a thin, consistent layer on its surface. You want enough ink to coat your block, but not so much that it clogs the details.
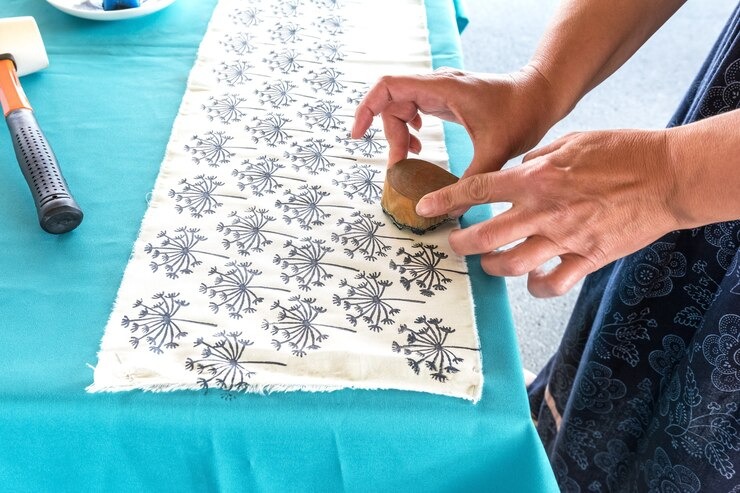
Step 3: Ink Your Block
- Carefully place your printing block onto the inked surface.
- Gently press the back of the block to ensure all raised areas pick up the ink.
- If using a brayer, you can also roll the brayer directly over the raised surfaces of your block to ink it.
- Lift the block. You should see a thin, even layer of ink covering the raised parts of your design. If any areas are missing ink, re-ink the block. If there’s too much ink, causing details to be lost, gently wipe some off the block and re-ink.
Step 4: Position and Print
- Carefully position your inked block onto your prepared fabric or paper. Take your time to align it exactly where you want the print to appear. If you’re planning a repeating pattern, consider using a pencil and ruler to mark guide dots for consistent placement.
- Once positioned, firmly and evenly press down on the back of the block. You can use the palm of your hand, a clean cloth, or even a rubber mallet (for stubborn blocks) to apply pressure. The goal is to transfer the ink completely from the block to the surface. Avoid wiggling the block, as this can smudge the print.
- Maintain pressure for a few seconds to allow the ink to transfer.
Step 5: Reveal Your Print!
- Gently lift the block straight up from the fabric or paper.
- Voilà! You should have a crisp, beautiful print. Each print will have its own unique character, which is part of the charm of block printing. Donuk Block Print, we celebrate these handcrafted touches!
Step 6: Repeat and Refine
- Re-ink your block for each new print.
- Continue printing, taking care with placement for a cohesive design. Practice makes perfect, and you’ll quickly get a feel for how much ink to apply and how much pressure to use.
- Experiment with different colors, patterns, and arrangements.
Step 7: Clean Up and Heat Set
- Cleaning: Immediately after printing, clean your blocks with water and a soft brush or cloth. If using fabric ink, soap can help. Don’t let the ink dry on your blocks, as it will be much harder to remove.
- Heat Setting (for fabric): This is crucial for making your print permanent and washable. Once your ink is completely dry (usually 24 hours), follow the manufacturer’s instructions for heat setting. This typically involves ironing the printed area on a medium-high setting for a few minutes, usually from the backside of the fabric, or placing a pressing cloth over the print. Heat sets the ink into the fibers, preventing it from washing out.
Tips for Beginner Block Printers:
- Start Simple: Begin with a simple block design and a single color. As you gain confidence, you can move to more complex patterns and multiple colors.
- Practice Makes Perfect: Don’t be afraid to experiment on scrap fabric or paper before tackling your final project.
- Less Is More with Ink: It’s easier to add more ink than to remove excess. Too much ink can cause your design to look blurry or clog fine details.
- Embrace Imperfection: Hand block printing is inherently imperfect. Slight variations in pressure or ink application add to the unique, organic charm of each piece. These aren’t flaws; they’re signatures of a handmade item!
- Work on a Firm Surface: A stable, flat surface will help ensure even pressure and clear prints.
- Ventilation: If using strong-smelling inks, ensure good ventilation in your workspace.
Block printing is more than just a technique; it’s a connection to history, artistry, and sustainable creation. By following these steps, you’ll not only create something beautiful but also gain a deeper appreciation for the intricate craft that we cherish at Adhunik Block Print.
So, gather your supplies, unleash your creativity, and start your block printing journey today! We can’t wait to see what you create.